Advances in LPV, Volumetric Lighting and a new Engine Architecture

Welcome once again, and thanks for clickin on my journal! 🙂

When we think of light propagation volumes we think of awesomeness with a ton of light bleeding, right? Well I do, so I’ve been trying to limit the amount of light bleeding and I find the current result acceptable without being too hackyish.

The first change is the injection. Usually I would inject the lighting in the same position as the voxels into a sh lighting map, but, once I do this I don’t have much information on which “direction” the lighting came from if I was to propagate the lighting. In that case I would have three choices, light bleeding, expensive occlusion calculation or not propagating (But the last one wouldn’t be any fun…). So, what if instead of injecting the lighting at the voxel position I inject it with a small offset, this offset would then be proportional to the approximated normal. In this way the actual lighting information would be injected into the empty space.

The 2nd change I made was simply discarding propagation in any occluded voxels/cells as the new method doesn’t require it. Now the issue with this is if the cell size ( How much a voxel/cell occupies in whatever unit your system uses ) is way too big compared to the world the propagation will visually fail and look horrible, so to look good a bit of performance is sucked.

The last change is when sampling the final indirect gi I apply a small offset as at all the lighting information is in the “empty” cells, now one might say that this is a crude approximation but I don’t find it that horrible.

So, there you have it, that’s my current recipe to a LPV system without bleeding, there are still lots of things to fix but it’s a start.

In my last entry I talked about a cascaded LPV system, however this has slightly changed. You can still configure multiple cascades; however the way it works is slightly different. In each cascade the system will create two grids, a high frequency grid and a low frequency grid (The dimensions of the grid is still intact). The low frequency grid represents the low frequency lighting information, and the high frequency grid will represent the slightly higher frequency lighting information. The two grids are treated as separate grids with different cell sizes but when rendered the energy proportion is taken into account.

So I’m fairly happy how my LPV system has progressed and I find the results acceptable, now obviously there’s the issue with the “blocky” look ( If you want an acceptable performance 🙂 ), which I’ll try and mess around with and share my results later on.

Now, let’s steer slightly away from that and think about volumetric fog! Yes! That’s right!

Volumetric Lighting!

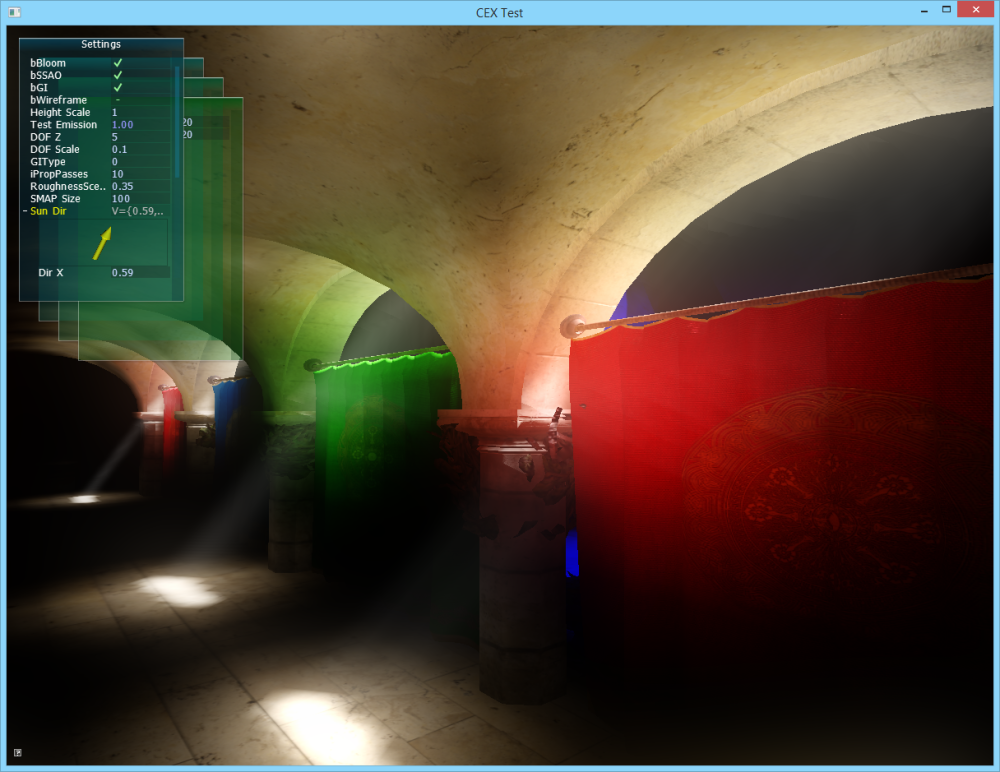
So to make the volumetric lighting feel more “part” of the scene I integrated the indirect gi system. Currently I have a very basic volumetric lighting setup, raymarch from the camera to the world space position at the pixel and slowly accumulate the lighting (The method I used to calculate the lighting is based on “Lords of the Fallen’s” [Game] Volumetric Lighting). So each raymarch I also sample the indirect gi from the propagated lighting map and multiply that in. And I’m really liking the results!

(I know the roughness / specular looks wrong, I still need to integrate the rougness / specular maps from the sponza scene) (And I seriously improved the quality of the gifs…)
Posted Image

Now! The only issue with this is… performance! All of that added together is asking your hardware to commit suicide, at least, mine did. Since I’m an addict to the game Dota 2, I was having a casual game with some friends and decided to program in the background, now for some reason I was writing and reading from an unbound UAV in my compute shader ( I didn’t realize this ). The result was the gpu completely freezing ( I could still talk and hear my friends, whilst freaking out ), I waited for the tdr duration however the tdr did not occur. So in the end I had to force shut down and restart quickly in order to participate in the game ( We won though! ). I was actually scared to start it again even though I bound the uav…

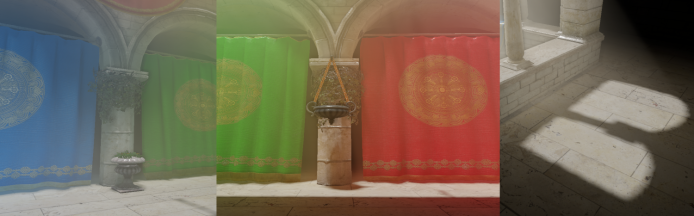
Looking aside from that I’ve also implemented some basic debugging tools for the lpv system, such as getting the lighting information from each cell position ( It’s extremely simple to implement, but really helps a lot ):
Posted Image

Previously my engine has a pretty horrible architecture, because I’m horrible at architecture, I’m a horrible person. So I decided to attempt at improving the architecture of the engine. I decided to split the engine up in:

  • Helpers : Just general things, common math stuff / etc…
  • Native Modules : Shaders, Containers, etc
  • User Modules : An example would be a custom voxel filler or whatever, depends on the type
  • Chains : Responsible for higher level actions, such as Shadow Mapping, Voxel GI, etc…
  • Device : Basically combining chains and working with them

Now I’m not saying that this is ideal or even good, but I find it nice and functional. Now the user modules are a bit special, the user modules are custom modules that the programmer can create. However each module has to derive from a module type. An example is the gi system, the gi system has a special module type that allows the modification of the lighting maps before the propagation. The programmer would then inherit from this type and override the pure virtual functions, and then push this module to a queue. I made a small module that would “approximate” the indirect radiance from the “sky” (Assuming that there is one) just to test around. The native c++ code is farily straight forward. Although this specific module type has a bunch of predefinitions and preprocessors in a shader file to ease the process, the shader code for this testing module:

#include "module_gridshfill.hlsl"

// Our basic module definition
MODULE((8, 1, 8), (uint3 CellPos : MODULE_CELLID) {
    // Testing data, This is just magic and stuff, not correct at all
    float fFactor = 0.01f;
    float3 f3Color = float3(0.658, 0.892, 1);
    float3x4 f3x4AmbientSH =
    {
        fFactor.xxxx * f3Color.x,
        fFactor.xxxx * f3Color.y,
        fFactor.xxxx * f3Color.z
    };

        // Raymarch Down
    [loop] for (CellPos.y = g_fVoxelGridSize-1; CellPos.y >= 0; CellPos.y--)
    {
        // Get the voxel
        VoxelData voxel = FETCH(CellPos - uint3(0, 1, 0));

        // If this voxel is occupied break the march
        // TODO: Semi occluded voxels (1<w>0)
        if (voxel.fOcclusion > 0)
        {
            break;
        }


        // Write the new value on top of the current value
        WRITE_ADDITION(CellPos, f3x4AmbientSH);
    }
});

Now some of the stuff will change for sure although it works fine for now. The result of the above is an indirect radiation from the “sky”. And it looks alright! So I’m pretty happy with the module system.

In the complete other hand I suddenly have this weird crave to work on my scripting language again… (I know I know, just use an existing one… But where would the fun be in that!? 🙂 ) And I soon need to reimplement some sort of physics engine into this version of my engine. So, there’s still lots of fun!

Looking away from some more or less small changes and additions, that’s more or less it folks! It’s been a heavy week though, lots of things happening. Fx my dog found out that a full day barbecue party is extremely tiring, he didn’t want to walk or anything, slept like a stone… (He loves walks).

Posted Image

See you next time!

Cascaded Light Propagation Volumes, VS RC 2015, Retarded Calculators + More stuff

Well, let’s begin shall we! 🙂 ( This article isn’t very focused, it’s just small notes and such )

======

For a while I’ve been thinking about working on cascaded light propagation volumes, so I finally did. For now I just have a 64 (detailed) + a 32 ( less detailed ) grid that are filled using the voxel caches. Although I have not worked on the energy ratio yet ( My solution is hacky ), I like the result.

(Images scaled to fit, originally rendered at resolution 1920×1080. The whitish color is because I’ve got some simple volumetric lighting going on, although it doesn’t respond to the LPV yet) (PS. Still lots of work, so there are issues + light bleeding ) ( And there’s no textures on the trees, for… reasons and stuffPosted Image )
Posted Image

I’ve also worked on my BRDF shading model which is based on Disneys solution, and integrated my BRDF shading model into the LPV system ( Although it’s a simplified version, as we don’t need all the detail and some computations are meaningless in this context ). And I really think it made the indirect colors feel more part of the scene.

A poor quality gif showing how the light propagates through the scene:
Posted Image

======

On the complete other side, as I’m rewriting the engine I felt like upgrading to the RC Version of VS 2015 ( And dear god I recommend it to anyone ). And so I needed to recompile lots of libraries, such as SFML ( + most dependecies ), AntTweakBar, +small stuff. Now the AntTweakBar case was special, as it really only supports SFML 1.6. It contains a minified version of the SFML 1.6 events that it then uses, although when the memory layout changes in SFML 2.3 it all fucks up (Sorry). So I had to change some of the minified internal version of SFML to make it work, for anyone here is the modified part of the minified sfml (It’s hackyish, mostly c&p from the sfml sources, so there’s most likely errors and such, but for now it does the job ):

EDIT: See the code here -> http://www.gamedev.net/blog/1882/entry-2261240-cascaded-light-propagation-volumes-vs-rc-2015-retarded-calculators-more-stuff/

On top of that the performance of my engine in VS 2015 strangely increased by a few milliseconds which really surprised me. I’m not completely sure what it is. And in VS 2013 I had a strangely huge overhead when starting my application inside VS which made the file io incredibly slow, in VS 2015 this issue is gone and this huge waiting time is gone ( 20 seconds to a minute… ) :).

I finally got to redesign my gbuffer, and while there’s lots of work to be done, it all fits nicely, general structure:

2Channel: x = Depth, y = Packed(metallicness, anisotropicness),
4Channel: xy = Normal, z = Packed(subsurface, thickness), w = Packed(specular, roughness)
4Channel: xyz = Diffuse, z = Packed(clear_coat, emmision)

The tangent is then reconstructed later, and it’s pretty cheap and works fine for my needs. Now all the user has to do is call GBuffer_Retrieve(…) from their shaders and then all the data is decompressed which they then can use, the final data container looks somewhat like the following:

struct GBufferData
{
	float3 Diffuse;
	float3 PositionVS;
	float3 TangentVS;
	float3 NormalVS;
	float3 Position;
	float3 Normal;
	float3 Tangent;
	float SpecPower;
	float Roughness;
	float Metallic;
	float Emmision;
	float ClearCoat;
	float Anisotropic;
	float SubSurface;
	float Thickness;
};

Now, you might say “But what if I don’t want to use it all, huge overhead”, which is true, but, compilers! The cute little compiler will optimize out any computations that aren’t needed, so if you don’t need a certain element decompressed, it wont be (Yay)! So all of that fits together nicely.

But at the same time I think I’ve got an issue with the performance concerning filling the gbuffer stage, as it’s huge compared to everything else. Perhaps it’s the compression of the gbuffer, not sure yet.
Posted Image

But, it’s acceptable for now, although I think I can squeeze some cute little milliseconds out of it :).

On a side note I’ve also been trying to work on some basic voxel cone tracing but it’s far from done. And I seriously underestimated the performance issues, but it’s pretty fun.

======

Now due to family related issues I had to take my brother to our beach house ( Nothing fancy ), and there I allocated some time to work on my retarded calculator! It’s a small application based on a very basic neural network, I didn’t have time to work on my bias nodes or even my activation function, for now the output of the neuron is simply weight[i] * data, although it actually produces acceptable results. The network is composed of 4 layers:

  • 10 Neurons
  • 7 Neurons
  • 5 Neurons
  • 1 Neuron

Again, this was just for fun, I didn’t even adapt the learning rate during the back propagation, it was just to fill out a bit of time. The output from the application:

Starting trianing of neural network
  Train iteration complete, error 0.327538
  Train iteration complete, error 0.294999
  Train iteration complete, error 0.266
  Train iteration complete, error 0.240112
  Train iteration complete, error 0.216965
  Train iteration complete, error 0.196237
  Train iteration complete, error 0.177651
  Train iteration complete, error 0.160962
  Train iteration complete, error 0.145959
  Train iteration complete, error 0.132454
  Train iteration complete, error 0.120285
  ......... a few milliseconds later
  Training completed, error falls within treshold of 1e-06!

===============================

  Final testing stage
  Feeding forward the neural network
  Final averaged testing error: 0.0178298

===============================

Please enter a command...
>> f var(a0)
  Input:
    #0 -> 2
    #1 -> 4
    #2 -> 3
    #3 -> 1
    #4 -> 4
    #5 -> 5
    #6 -> 2
    #7 -> 3
    #8 -> 4
    #9 -> 1
  Feeding forward the neural network
  Layer Dump:
    #0 = 29.346

>> e var(a0) algo({sum(I)})
  Evaluating error: (a0)
    Error: 0.345961

======

So, overall, I’m pretty happy with it all. But I haven’t been able to allocate enough time ( You know, life and stuff, school or whatever everybody suddenly expects of you ). But if anybody is reading this, can you comment on the colors of the images, meaning do you find it natural or cartoony, I find them a bit cartoony. Well, thanks for even reaching the bottom!

Less bullshit… More code!

The word “bullshit” is probably an exaggeration, although I honestly dislike it like everyone else does ( At least to my understanding ). What I’m talking about is the glorious exams, not university exams just regular high school exams. But that part is over now, and I’m more or less satisfied with the result. Now, since that part is over, I got lots of time to code and stuff…

Just since the beginning of the exams to now, I’ve been rewriting my engine. And got pretty much everything implemented. The performance was the main goal. The previous version of my engine ran at ~100 fps at half of the screen resolution, the newely written engine runs at ~120 fps at full HD resolution (i.e. 1920 x 1080). Now this is a big thing because I’ve got a lot of post processing effects that really torture the gpu bandwith, such as volumetric scattering, so the resolution seriously affects the frame time. And together with that the architecture of the new system is seriously better together with the new material system that I wrote about in my last entry ( It has been upgraded a bit from that point )

There’s still lots of small optimizations to do, and still lots of unfinished “new” features. But one of the main things I changed is the way my voxelization system works. Every single time a new mesh/object/whateverpeoplecallit has been added the scene the mesh is voxelized without any transformation applied to a “cache” buffer, this cache buffer is added to some list of a sort. Then there’s the main cache buffer that represents the final voxel structure around the camera. So each frame ( through a compute shader ) all voxel caches are iterated through, then each cell of the caches are first transformed by the current transformation matrix of the mesh ( As each cache represents a mesh without any transformations ) and then fitted inside the main voxel cache ( With some magic stuff that speeds this up ). The awesome thing about this is that every single time the camera is moved / the mesh is moved, scaled or even rotated there no need to revoxelize the mesh at all ( Less frame time, yay ).

Although I chose to disable screen space reflections as IMHO there were too many artifacts which were too noticeable. So in the meantime I have a secret next gen way to perform pixel perfect indirect specular reflections ( I WISH Posted Image )

Currently, all effects combined minus the ssr, showing off volume shadows. Nothing fancy.
.
Posted Image
.
Oversaturated example of the diffuse gi:
.
Posted Image
.
Dynamic filling of the voxel cache, oriented around the player:
.
Posted Image
.
So while playing around, I found this “mega nature pack” in the Unreal Engine 4 marketplace. So I purchased the package and started messing around, just programmer art Posted Image. Now all this shows is that I have some serious work to do with my shading model, and I need to invest some time into some cheap subsurface scattering… Btw in the image below the normals are messed up, so the lighting appears weird in some points. And the volumetric scattering is disabled, since it also desaturates the image a bit ( For valid reasons ).
.
Posted Image
.
So I tried messing around with the normals and used the SV_IsFrontFace to determine the direction of the normal on the leaf, and got something like this: ( Volumetric scattering disabled ) ( Btw, quality is lost due to gifs! I love dem gifs ) ( Ignore the red monkey )
.
Posted Image

.
The following is the shader used for the tree, which is written by the user: ( Heavily commented )
.

Shader 
{
	// Include the CG Data Layouts
	#include "cg_layout.hlsl"
	
    // Define the return types of the shader
	// This stage is really important to allow the parser
	// to create the geometry shader for voxelization
	// and also if the user has created his own geometry shader, so that it can figure
	// out a way to voxelize the mesh properly, in this way the user
	// can use ALL stages of the pipeline (VS, HS, DS, GS, PS) without
	// voxelization not being possible.
	// The only problem is well, he has to write the stuff below: ( Even more if he used more stages )
	#set CG_RVSHADER Vertex //       Set the return type of vertex shader
	#set vert CG_VSHADER    // [Opt] Set the name of the vertex shader instead of writing CG_VSHADER
	#set pix CG_PSHADER     // [Opt] Set the name of the pixel shader instead of writing CG_PSHADER
	
	// This is his stuff
	// He can do whatever he wants!
	Texture2D T_Diffuse : register(t0);
	Texture2D T_Normal : register(t1);
	
	// Basic VS -> PS Structure
	// This structure inherits the "base" vertex, stuff that the engine can crunch on
	struct Vertex : CG_VERTEXBASE
	{
		// Empty
	};
	
	// Now include some routines that's needed on the end of all stages
	#include "cg_material.hlsl"
	
	// Vertex shader
	Vertex vert(CG_ILAYOUT IN)
	{
		// Zero set vertex
		Vertex o = (Vertex)0;
		
		// Just let the engine process it
		// Although we could do it outselves, but there's no need
		CG_VSPROCESS(o, IN);
		
		// Return "encoded" version
		CG_VSRETURN(o);
	}
	
	// Pixel Shader
	// In this case the return type is FORCED! As it's a deferred setup
	CG_GBUFFER pix(Vertex v, bool IsFrontFace : SV_IsFrontFace)
	{
		// Basic structure containing info about the surface
		Surface surf;
		
		// Sample color
		float4 diff = CG_TEX(T_Diffuse, v.CG_TEXCOORD);
		
		// Simple alpha test for vegetation
		// We want it to clip at .a = 0.5 so add a small offset
		clip(diff.a - 0.5001);
		
		// Fill out the surface information
		surf.diffuse = diff;
		surf.normal = CG_NORMALMAP( // Do some simple normal mapping
			T_Normal, 
			v.CG_TEXCOORD,
			v.CG_NORMAL * ((IsFrontFace) ? 1 : -1), // Flip the normal if backside for leaves
			v.CG_TANGENT, v.CG_BINORMAL
			);
		surf.subsurface = 1; // I've got a simple version of some sss, but it's not very good yet.
		surf.thickness = 0.1; // For the sss
		surf.specular = 0.35;
		surf.anisotropic = 0.2;
		surf.clearcoat = 0;
		surf.metallic = 0;
		surf.roughness = 0.65;
		surf.emission = 0;
		
		// Return "encoded" version
		// Aka compress the data into the gbuffer!
		CG_PSRETURN(v, 	surf);
	}
};

.
So in the progress of all of this, I’m trying to fit in some SMAA and color correction. And the moment I looked into color correction using LUT, I face palmed, because how the hell did I not think of that!? ( Not in a negative way, it’s just so simple and elegant and pure awesome! ) So messing around with that and spending 5 hours on a loading problem which turned out to be too simple, it returns some kewl results: ( Just messing around )
.
Posted Image
.
So that’s more or less it. I’ll keep improving my engine, working on stuff and more stuff. I think I’ll leave the diffuse gi system where it is for a while, since it works pretty well and produces pretty results, now I need to work on some specular gi stuff since I really don’t have a robust system for that yet that doesn’t produce ugly artifacts.

See you next time people of the awesome GDNet grounds! ( GDNet -> GameDev.net )
-Migi0027

New Shading Model and Material System!

PS: No screenshots this time, just me talking! Posted Image

I haven’t really been active lately because of the glorious exams that are nearing me, but it’s still nice to know that it’s close to over ( At least this round ).

So as the title says, I’ve been working on a new shading model that tries to support all of the modern techniques. Now two features that I’m really excited about is anisotropic surfaces and subsurface scattering with direct light sources. However I still have to improve my implementation of the clearcoat shading, as I’m still missing some important ideas about it.

On the other hand I decided to rewrite my material system, which is the one that the user will write for his own custom surface shaders ( For meshes ). Now previously I did a ton of string parsing but honestly it’s just unnecessary and it didn’t give me the freedom I needed. So, I went full on BERSERK MODEwith macros. Now it may not seem like there’s much macro work, but there is Posted Image!. So I simply have a file full of macros, and when the user requests to load a material file, it simply pastes his code into the file ( Well after a bit of parsing the material file ) and compiles it as a shader.

Example material:

Input
{
        Texture2D g_tNormalMap,
	float3 g_f3Color = (0.7, 0.7, 0.7),
	float g_fSubsurfaceIntensity = 0,
	float g_fAnisotropicIntensity = 0,
	float g_fClearcoatIntensity = 0,
	float g_fMetallicIntensity = 0,
	float g_fSpecularIntensity = 0,
	float g_fRoughness = 0,
};

Shader 
{
	#set vert CG_VSHADER
	#set pix CG_PSHADER // I have a deep dark fear of "frag"
	
	// Basic VS -> PS Structure
	struct Vertex
	{
                // This is a must! In the future I'll allow him to create his entire own structure
                // as not much work is needed for it, but it still simplifies a lot of his work
		CG_VERTEXBASE

                // The user could pass any other variable he wanted here
	};
	
	Vertex vert(CG_ILAYOUT IN)
	{
		// Zero set vertex
		Vertex o = (Vertex)0;
		
		// Just let the engine process it, the user may do this on his own
                // but in usual cases he really doesnt want to
		CG_VSPROCESS(o, IN);
		
		// Return encoded version
		CG_VSRETURN(o);
	}
	
	CG_GBUFFER pix(Vertex v)
	{
                float3 Normal = CG_NORMALMAP(
                                      v.CG_NORMAL, 
                                      CG_SAMPLE(g_tNormalMap, v.CG_TEXCOORD)
                                );

                // the same can be done for parallax mapping or whatever the user desires

		// Set up the surface properties
		Surface surf;
		surf.diffuse = g_f3Color;
		surf.normal = Normal;
		surf.subsurface = g_fSubsurfaceIntensity;
		surf.specular = g_fSpecularIntensity;
		surf.roughness = g_fRoughness;
		surf.metallic = g_fMetallicIntensity;
		surf.anisotropic = g_fAnisotropicIntensity;
		surf.clearcoat = g_fClearcoatIntensity; // Doesnt work yet!
		
		// Return encoded version
		CG_PSRETURN(v, 	surf);
	}
};

And that’s about it!
As always, until next time!

Screen Space Reflections ( SSR ) – CONTINUED ( Aka Improvements )

So I’ve been working on my screen space reflections (SSR) and have been trying to eliminate artifacts. The next step will be the somehow make it more physically, because currently I just base the strength of the reflection linearly on the roughness ( sorta ).

Sponza Scene ( Yes, again ) ( Oh, and I decreased the intensity, although its configurable by the user, as the previous intensity was WAY too high ):
PS: Notice the weird line artifact below the arches, I still have to figure out what that is, including a few other artifacts. :). And I forgot to disable fog, so the colors are a bit dimmed down.
Posted Image
Posted Image
Posted ImagePosted Image
.
Another testing scene, the direction of the sun is very low on purpose to enhance the reflections. This is the scene WITHOUT SSR:
Posted Image
.
Then, WITH SSR:
Posted Image
Posted Image
Posted Image
.
And, as always, that’s it!

Screen Space Reflections ( SSR ) – We must all accept yoshi_lol as our lord and true saviour!

So I finally got a basic implementation of Screen Space Reflections ( SSR ), aside from the fact that its screen space and some artifacts it’s actually ok. Now, you may wonder why the title is as following:

“We must all accept yoshi_lol as our lord and true saviour!”

I based my implementation on the article from Casual Effects:
http://casual-effects.blogspot.dk/2014/08/screen-space-ray-tracing.html

However I was in trouble as there were a few conversion problems from GLSL -> HLSL, not the syntax conversion. So there yoshi_lol ( User from GameDev.net ) came, gave me his implementation and from there I saw how he converted it to D3D-HLSL. Thanks yoshi_lol! So now we must accept him as our true lord and saviour. 🙂

Anyway…

Screenshots! ( There are many artifacts, it’s a very early implementation, so there are many areas that look really messed up! )
Posted Image
Posted Image
Posted Image
Posted Image
.
And that’s about it!

Until next time! :)

Trees!

This isn’t really a new big update, just me talking a bit and showing some pictures. 🙂

Well, as the title suggests I wanted to play with trees, to see how my shading model handles vegetation together with GI. Now aside from the performance as I’ve disabled any frustum culling, the performance is not too bad. However there’s still LOTS of work in the shading model of surfaces where light is guaranteed to pass through, so the images might be a bit weird…

There’s also a few problems with my volumetric lighting. Currently I find the vector between the world space position and the world space position of the pixel, but, if the ray is TOO long, then what? I know there’s some really nice research published by Intel that describes large scale outdoor volumetric lighting, however I’m not going to dive into that right now as it’s a lot of work.

So, as people want to see pictures, I give you pictures!

Posted Image
.
Now, for the fun of it, why not render 6000 trees!

Posted Image

Color Grading

So something I never got a basic implementation of was color grading, so today I decided to get a rough implementation. There’s still lots to work on, its based on the NVIDIA’s post complement sample (http://developer.download.nvidia.com/shaderlibrary/webpages/shader_library.html).

Color Grading DISABLED vs ENABLED:
Posted Image
.
And that’s all, until next time! And enough about the damn white/gold/purple/brown/etc… dress!

Volumetric Lighting!

So one topic that we all hear over and over is VOLUMETRIC LIGHTING ( caps intended ). Why? Because its so damn awesome. Why not? Because it can get expensive depending on the hardware. So after countless of tries I scrapped the code I’ve been wanting to shoot then resurrect then shoot again and just wrote what made sense, and it worked!

The implementation is actually really simple, in simple terms I did it like this: ( I havent optimized it yet, E.g. I should do it all in light view space )

// Number of raymarches
steps = 50

// Get world space position
positionWS = GetPosition();

// Get world space position of the pixel
rayWS = GetWorldSpacePixelPos();

// Get ray between world space position and pixel world space pos
v = positionWS - rayWS;
vStep = v / steps;

color = 0,0,0
for i = 0 to steps
    rayWS += vStep;

    // Calculate view and proj space rayWS
    rayWSVS = ...
    rayWSPS = ...

    // Does this position recieve light?
    occlusion = GetShadowOcclusion(..., rayWSPS);

    // Do some fancy math about energy
    energy = ... * occlusion * ...

    color += energy.xxx;

return color * gLightColor;

Results: ( Its not done yet )

Posted Image

Posted Image
.

Thats all! Until next time!

The beginning of particle simulation

Last Entry: http://www.gamedev.net/blog/1882/entry-2260844-got-new-particle-rendering-up-and-running-simulation-next/

So I got a basic backbones of the simulation system up and running. The simulation happens in a compute shader, and everything just works out, which is great! 🙂 So to test it out I put two point masses with low intensity a bit from eachother, and this was the result.
Next step will to be stretch the particles based on velocity for a fake like motion blur, and then allowing the particles to collide with the objects around them.

GIF: ( Its a bit large )

http://i.imgur.com/il5rcCk.gif

Until next time!